
What’s the Best Way to Get Chocolate Stains Out of Clothes?
Follow our helpful techniques for removing chocolate stains, including the best natural products to use.
Read More

Last Updated: April 15, 2022
Ready to naturally color your Easter eggs with items you already have in your kitchen? Check out these easy steps for creating your own dyes at home, plus which colors to combine for vibrant hues.
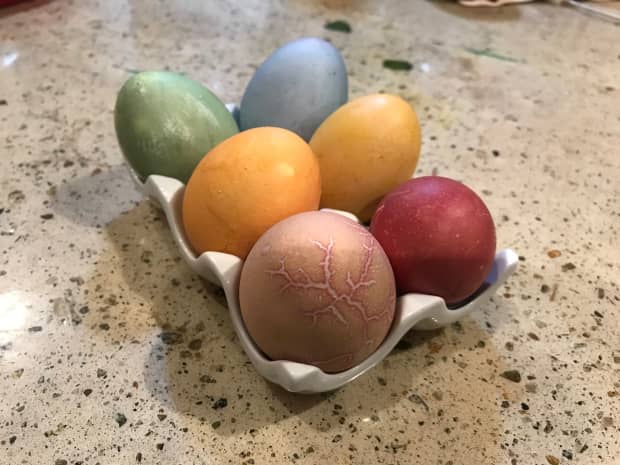
We all love the nostalgic quality of dyeing those bright Easter eggs. Maybe you remember gathering around the kitchen table covered in newspapers or grocery bags as a kid, with little dye tabs or food coloring and spoons ready to go. You loved the way those tabs fizzed in the water, and the way they transformed your hard boiled eggs into bright colors. Or maybe it’s a tradition you’ve carried over to your own family over the years.
Those little fizzy tabs might actually be full of carcinogenic chemicals: As seen on NPR and the Center for Science in the Public Interest, traditional colors in food can be linked to cancer, as well as behavioral and attention problems in children. Doesn’t sound like it’s worth the risk for the color payoff anymore, does it? Instead of limiting yourself to bland eggs this season to avoid artificial dyes, try switching to food-safe dyes made from stuff you might already have in your fridge or spice drawer.
After some trial and error testing commonly suggested natural food dyes on Google, we’ve found the best blends and techniques to score the colors you crave. Spoiler alert: It often takes a lot more food scraps than you think.
Whichever dyes you decide to create and color combinations you choose, we recommend prepping the dyes a day before you plan on dunking your Easter eggs, as creating multiple colors can be time consuming. Once the dyes are done, it’s easy enough to dip and experiment once you get started, so use our guide as a loose suggestion for spurring your creativity this spring season.
Here are a few of the basic items you’ll want on hand to prep your food dyes — keep reading for which food items and spices produce the most vibrant colors, plus our favorite color combinations.
We experimented with both brown and white eggs with wildly different results, so we’ve tried to capture the variance where we could.
Grove Tip
Unless you’ve been saving loads upon loads of onion skins, you’ll likely need to buy a few from the store (or go seeking the skins shed around the produce aisle, like we did). If you’re at a loss with what to do with all those now-naked onions, consider pickling them for a welcome topper on tacos or other Mexican dishes.
Once you’ve decided which colors you’ll attempt, what you’ll need is a healthy dose of each food or spice, plus plenty of patience — and a few different pans.
Now that you’ve prepped the dyes and decided on your color combinations, the process is pretty simple. Make sure you have plenty of hard-boiled eggs on hand; we loved experimenting with white, brown, and a few pastel-hued eggs from our backyard chickens.
Grove Tip
Use these color suggestions as a baseline to build your own blends. Think funky, on-trend colors like chartreuse (turmeric + cabbage), lavender (beets + cabbage), and salmon (turmeric + onion skin) by mixing and matching pigments.
Follow our helpful techniques for removing chocolate stains, including the best natural products to use.

A professional organizer shows you how to detox your plastic containers, outdated kitchen tools, and expired items.

From health to beauty to your home, we break down how ACV can do you a lot of good.